Mind-sync
«««< HEAD
Mind-sync
A new Flutter project.
Getting Started
This project is a starting point for a Flutter application.
A few resources to get you started if this is your first Flutter project:
For help getting started with Flutter development, view the online documentation, which offers tutorials, samples, guidance on mobile development, and a full API reference. =======

Mind-sync 🎯
To find the same minds and enjoy the moments
Team Name: Unicorn
Team Members
- Member 1: Aswathy P J - Government Engineering College Idukki
Hosted Project Link
https://aswathypj27.github.io/Mind-sync/
Project Description
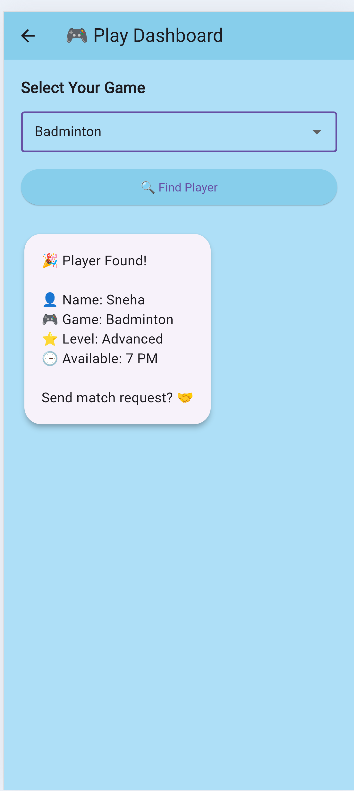
MoodMatch is a fun dual-mode app that balances productivity and play. In Study Mode, it generates a smart study plan, tracks live study time with levels and XP, and even unlocks a “future letter” on a selected date. In Play Mode, it matches students with other players who share the same game interests using intelligent dummy matchmaking.
The Problem statement
Many students struggle to balance academics and social life, often feeling stressed, unmotivated, or disconnected from peers who share similar interests. Existing apps focus only on productivity or only on entertainment, but not both together. There is a need for a unified platform that helps students manage their studies effectively while also connecting with others for recreational activities
The Solution
We solve this by creating a dual-mode platform that combines productivity and social engagement in one app.
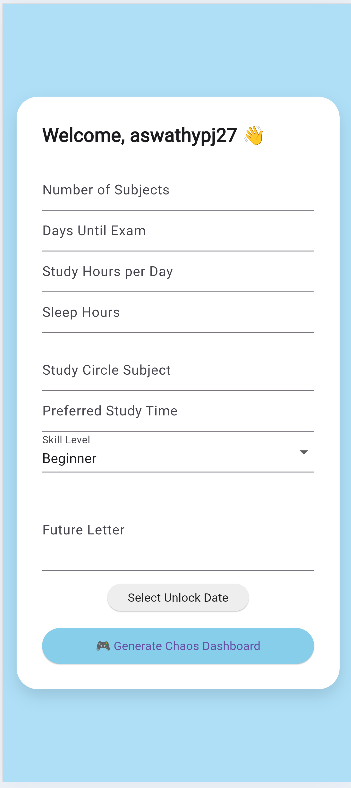
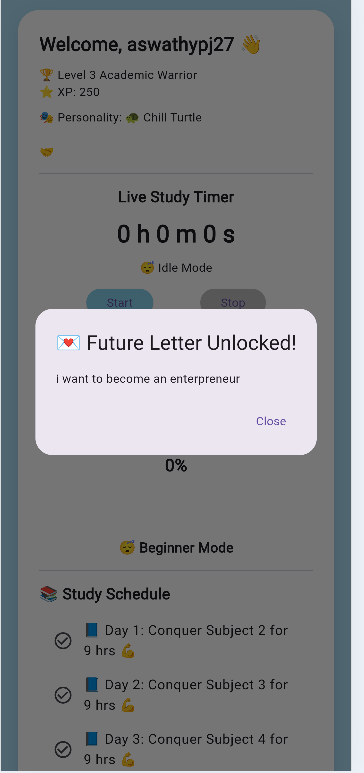
In Study Mode, the app generates a personalized study schedule, tracks live study time with a timer and progress levels (XP system), and includes a “Future Letter” feature that unlocks on a selected date to motivate users.
In Play Mode, the app matches students with others who share similar game interests using smart dummy matchmaking logic, helping them connect and build social interaction.
This way, the app supports both academic growth and mental well-being in a single ecosystem.
Technical Details
Framework: Built using Flutter (Dart) for cross-platform development (Android, Web, Desktop).

State Management: Uses StatefulWidget and setState() for dynamic UI updates.

Local Storage: Integrated SharedPreferences to store user data such as XP, study time, schedule, and future letter with unlock date persistence.

Timer System: Implemented using Dart’s Timer class to track live study sessions and calculate total study duration.

Matchmaking Logic: Uses dummy dataset filtering logic to match students based on selected game interests.

UI/UX: Custom themed UI with soft color palette, progress bars, emoji-based status indicators, and dashboard-style layout.

Navigation: Managed using Navigator.push and MaterialPageRoute for screen transitions between Login, Study Dashboard, and Play Dashboard. ### Technologies/Components Used 💻 Development Framework

Flutter – Cross-platform UI framework

Dart – Programming language used to build the app
📦 Packages & Libraries
shared_preferences – For local data storage (XP, timer data, future letter, schedule)

material.dart – For UI components and Material Design widgets
⏱ Core Components
Timer (Dart async library) – To implement live study timer

Stateful Widgets – For dynamic UI updates

Navigator & MaterialPageRoute – For screen navigation
🎨 UI Components
Scaffold

AppBar

Cards

TextField

DropdownButtonFormField

LinearProgressIndicator (for status bar)

ElevatedButton

ListView
📊 Functional Modules
Study Planner Logic

XP & Level System

Student Matchmaking (Dummy Data Filtering)

Future Letter Lock/Unlock System

Live Study Timer with Emoji Status
For Software:
- Languages used:Dart
- Frameworks used:Flutter
- Libraries used:shared_preferences, material.dart (Flutter Material Components), dart:async (Timer)
- Tools used:VS Code / Android Studio, Flutter SDK, Git, GitHub
For Hardware:
- Main components: [List main components]
- Specifications: [Technical specifications]
- Tools required: [List tools needed]
Features
List the key features of your project:
- Feature 1: Dual Mode System (Study Mode & Play Mode) – Allows users to manage academics and also connect with peers for games within one app.
- Feature 2: Smart Study Planner & XP System – Generates a personalized study schedule with level progression and XP tracking based on study input
- Feature 3: Live Study Timer with Progress Bar – Tracks real-time study sessions with emoji-based status indicators and total study time analytics.
- Feature 4: Future Letter Unlock System – Users can write a motivational letter that remains locked and automatically unlocks on a selected future date.
-
Feature 5: Student Matchmaking (Dummy Logic) – Matches students with similar game interests using filtering logic for social engagement.
Implementation
The application is developed using Flutter and Dart with a modular screen-based structure.
The Study Mode includes schedule generation, XP calculation, and a live study timer implemented using Dart’s Timer.
User data such as study time, level, schedule, and future letter are stored locally using SharedPreferences for persistence.
The Play Mode uses dummy data filtering logic to match students based on selected game interests.
Navigation between screens is handled using Flutter’s Navigator and MaterialPageRoute.
For Software:The application is built using Flutter (Dart) with a modular screen-based structure (Login, Planner, Study Dashboard, Play Dashboard).
User data such as study schedule, XP, timer progress, and future letter are stored locally using SharedPreferences for persistence.
The live study timer is implemented using Dart’s Timer, and student matchmaking in Play Mode is handled using dummy data filtering logic.
Navigation between screens is managed using Navigator and MaterialPageRoute.
Installation
flutter pub get
Run
flutter run
For Hardware:
Components Required
[List all components needed with specifications]
Circuit Setup
[Explain how to set up the circuit]
Project Documentation
For Software:
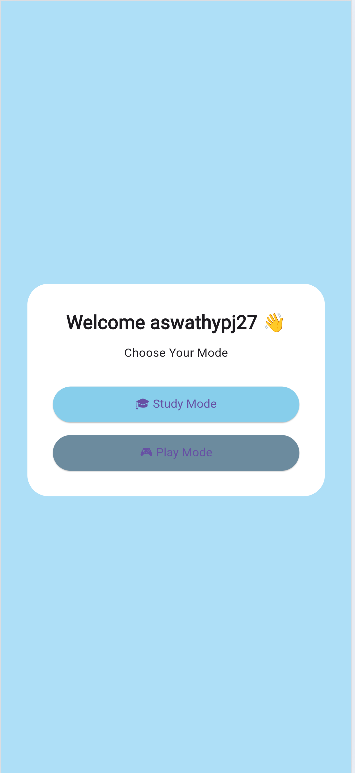
Screenshots (Add at least 3)
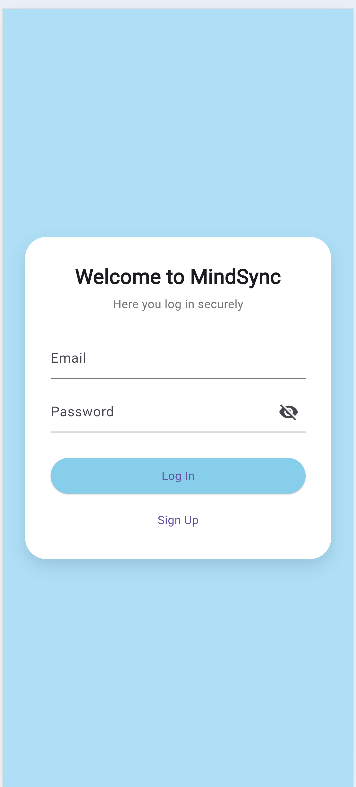 Add caption explaining what this shows
 Add caption explaining what this shows
 Add caption explaining what this shows

Diagrams
System Architecture:
 Explain your system architecture - components, data flow, tech stack interaction
Application Workflow:
 Add caption explaining your workflow
For Hardware:
Schematic & Circuit
Add caption explaining connections
Add caption explaining the schematic
Build Photos
List out all components shown
Explain the build steps
Explain the final build
Additional Documentation
For Web Projects with Backend:
API Documentation
Base URL: https://api.yourproject.com
Endpoints
GET /api/endpoint
- Description: [What it does]
- Parameters:
param1(string): [Description]param2(integer): [Description]
- Response:
{
"status": "success",
"data": {}
}
POST /api/endpoint
- Description: [What it does]
- Request Body:
{ "field1": "value1", "field2": "value2" } - Response:
{
"status": "success",
"message": "Operation completed"
}
[Add more endpoints as needed…]
For Mobile Apps:
App Flow Diagram
 Explain the user flow through your application
Installation Guide
For Android (APK):
- Download the APK from [Release Link]
- Enable “Install from Unknown Sources” in your device settings:
- Go to Settings > Security
- Enable “Unknown Sources”
- Open the downloaded APK file
- Follow the installation prompts
- Open the app and enjoy!
For iOS (IPA) - TestFlight:
- Download TestFlight from the App Store
- Open this TestFlight link: [Your TestFlight Link]
- Click “Install” or “Accept”
- Wait for the app to install
- Open the app from your home screen
Building from Source:
# For Android
flutter build apk
# or
./gradlew assembleDebug

# For iOS
flutter build ios
# or
xcodebuild -workspace App.xcworkspace -scheme App -configuration Debug
For Hardware Projects:
Bill of Materials (BOM)
| Component | Quantity | Specifications | Price | Link/Source |
|---|---|---|---|---|
| Arduino Uno | 1 | ATmega328P, 16MHz | ₹450 | [Link] |
| LED | 5 | Red, 5mm, 20mA | ₹5 each | [Link] |
| Resistor | 5 | 220Ω, 1/4W | ₹1 each | [Link] |
| Breadboard | 1 | 830 points | ₹100 | [Link] |
| Jumper Wires | 20 | Male-to-Male | ₹50 | [Link] |
| [Add more…] |
Total Estimated Cost: ₹[Amount]
Assembly Instructions
Step 1: Prepare Components
- Gather all components listed in the BOM
- Check component specifications
- Prepare your workspace
 Caption: All components laid out
Step 2: Build the Power Supply
- Connect the power rails on the breadboard
- Connect Arduino 5V to breadboard positive rail
- Connect Arduino GND to breadboard negative rail
 Caption: Power connections completed
Step 3: Add Components
- Place LEDs on breadboard
- Connect resistors in series with LEDs
- Connect LED cathodes to GND
- Connect LED anodes to Arduino digital pins (2-6)
 Caption: LED circuit assembled
Step 4: [Continue for all steps…]
Final Assembly:
 Caption: Completed project ready for testing
For Scripts/CLI Tools:
Command Reference
Basic Usage:
python script.py [options] [arguments]
Available Commands:
command1 [args]- Description of what command1 doescommand2 [args]- Description of what command2 doescommand3 [args]- Description of what command3 does
Options:
-h, --help- Show help message and exit-v, --verbose- Enable verbose output-o, --output FILE- Specify output file path-c, --config FILE- Specify configuration file--version- Show version information
Examples:
# Example 1: Basic usage
python script.py input.txt

# Example 2: With verbose output
python script.py -v input.txt

# Example 3: Specify output file
python script.py -o output.txt input.txt

# Example 4: Using configuration
python script.py -c config.json --verbose input.txt
Demo Output
Example 1: Basic Processing
Input:
This is a sample input file
with multiple lines of text
for demonstration purposes
Command:
python script.py sample.txt
Output:
Processing: sample.txt
Lines processed: 3
Characters counted: 86
Status: Success
Output saved to: output.txt
Example 2: Advanced Usage
Input:
{
  "name": "test",
  "value": 123
}
Command:
python script.py -v --format json data.json
Output:
[VERBOSE] Loading configuration...
[VERBOSE] Parsing JSON input...
[VERBOSE] Processing data...
{
  "status": "success",
  "processed": true,
  "result": {
    "name": "test",
    "value": 123,
    "timestamp": "2024-02-07T10:30:00"
  }
}
[VERBOSE] Operation completed in 0.23s
Project Demo
Video
[Add your demo video link here - YouTube, Google Drive, etc.]
Explain what the video demonstrates - key features, user flow, technical highlights
Additional Demos
[Add any extra demo materials/links - Live site, APK download, online demo, etc.]
AI Tools Used (Optional - For Transparency Bonus)
If you used AI tools during development, document them here for transparency:
Tool Used: [e.g., GitHub Copilot, v0.dev, Cursor, ChatGPT, Claude]
Purpose: [What you used it for]
- Example: “Generated boilerplate React components”
- Example: “Debugging assistance for async functions”
- Example: “Code review and optimization suggestions”
Key Prompts Used:
- “Create a REST API endpoint for user authentication”
- “Debug this async function that’s causing race conditions”
- “Optimize this database query for better performance”
Percentage of AI-generated code: [Approximately X%]
Human Contributions:
- Architecture design and planning
- Custom business logic implementation
- Integration and testing
- UI/UX design decisions
Note: Proper documentation of AI usage demonstrates transparency and earns bonus points in evaluation!
Team Contributions
License
This project is licensed under the [LICENSE_NAME] License - see the LICENSE file for details.
Common License Options:
- MIT License (Permissive, widely used)
- Apache 2.0 (Permissive with patent grant)
- GPL v3 (Copyleft, requires derivative works to be open source)
Made with ❤️ at TinkerHub
78d9a7466c822a3aebbbf1fdcf236a329d4c8a1d